Rifle Sighting Stand
Rifle Sighting Stand
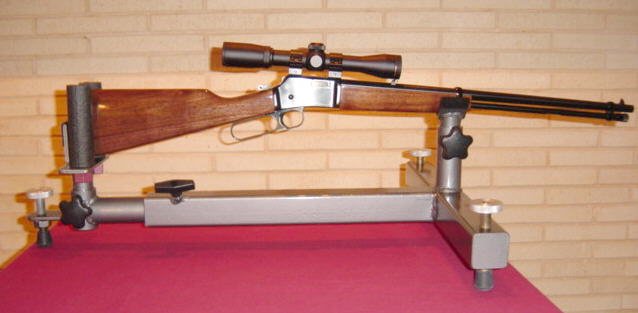
Here's a rifle sighting stand I built for my Browning rifle. It's fully
adjustable and very solid.
It's made from 2" square tubing and some 1 3/4" pipe I had on hand.
The sighting stand makes it very easy to zero in the scope. Just center
the scope cross hairs on the
bullseye and fire a shot. With the scope still centered on the bullseye
(and held firm in the stand)
use the adjustments on the scope and move the crosshairs to the hole from
the bullet just fired
(without moving the rifle / stand). Now re center the stand / rifle on
the bullseye and fire another
shot and repeat if needed. Usually two shots and my scope is dead on!
I've included the measurements and building details I used below.

Stock end
Please note that pipe thickness affects the ID measurements so check
for a good fit.
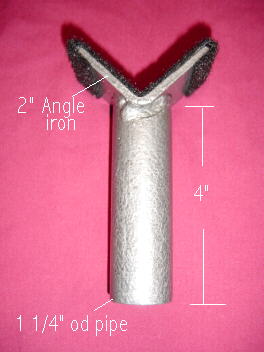
For the three adjustment legs I used 5/8" all thread.
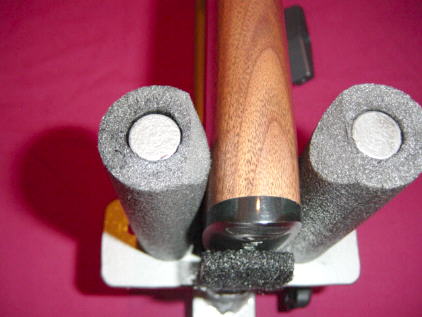
The rifle stock is held in place by two 5/8" steel rods 5" long. They
are covered by foam pipe insulation. Each rod is drilled
and tapped to accept a 1/4" x 20 bolt from the bottom. This allows
the rods to be adjusted for different widths
stocks. I used some spray paint inside of the foam insulation to act
as a glue. I used my bench grinder to
bevel the foam at the top.
The black covering is industrial self adhesive velcro.
I used my mini mill to make the slots for the post adjustment.
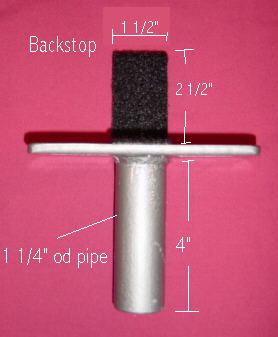
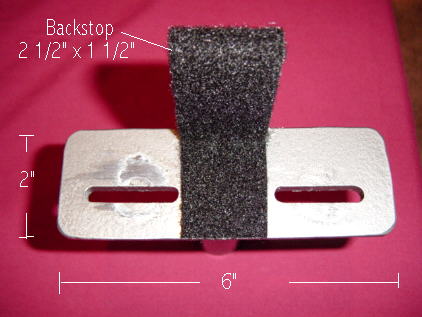
Stock support bracket
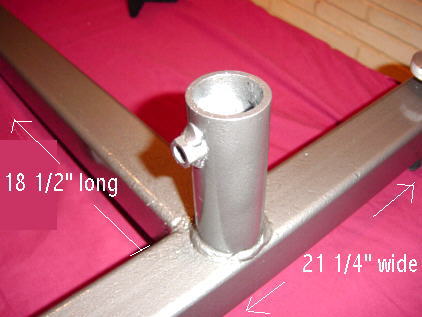
2" square tubing frame. 21 1/4" wide x 18 1/2" wide
I used pipe that fit nicely inside the square tubing.
The adjustment bolt is mounted at a 45 degree angle.
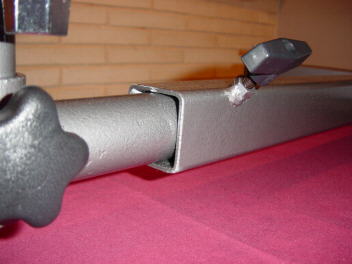
Front support (barrel end)
The adjustment handles are from the local hardware store and
use a 3/8" thread
Front support (barrel end)
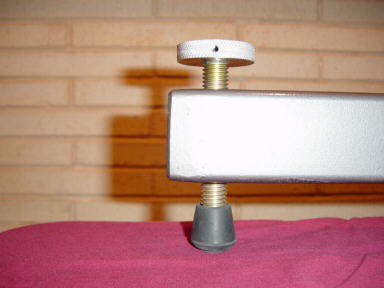
The adjustment bolt is 5/8 all thread
I drilled a 5/8 hole through the 2" square tubing on my drill press.
I then welded a 5/8 nut inside the square tubing (just welded the sides
of the nuts or what I could reach with a welding rod) I then welded
up the ends of the square tubing with some 1/8" plate.
I added some 5/8 rubber caps from the local hardware store.

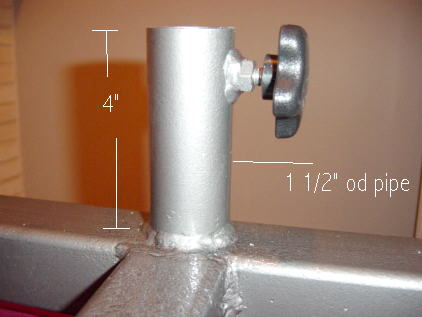
The knobs for all the adjustment bolts are made from 3/8" thick aluminum.
I used a 2" bimetal hole saw to produce the 1 3/4" od aluminum knob.
I then drilled out the center of each knob to 7/16". I used my metal
lathe
to turn a 7/16" shoulder on each 5/8" leg. I also used my lathe to
knurl the pattern shown. I drilled and tapped each knob for a
set screw that holds it firmly to the 7/16" shoulder.
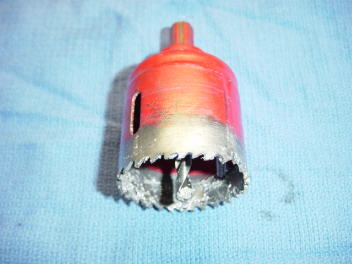
2" bimetal hole saw I used to make the adjustment knobs.
The cutout piece from the hole saw leaves a 1 3/4" round circle.
Works great for knobs!
Comments / Questions / Suggestions or Add Your Link
This information is provided for personal use only
Copyright 2002 / 2005 Steve
Bedair